
Here are some installation pictures.
Assembly
1) Door-catch 2) Anchor Plate 3) Pull-Rods
The
Ramp ,in folded position, is placed, with the anchor-plate in the cargo area,
as close as possible(+or- 5cm/2inch) to the closed doors.The pull-rods must
be regulated, so that the ramp(in folded position) is in approximately vertical
position on the floor of the cargo area.Then mark off holes,drill and screw
tight.
The anchor-plate is firmly screwed onto the floor of the cargo area,and parallel
to the end of the cargo floor surface.
The door-catch is attached to the left door,the short hook drops between
the two sections of the ramp.
CAUTION!!
The two pull rods must always remain attached during opening and closing
of the ramp. 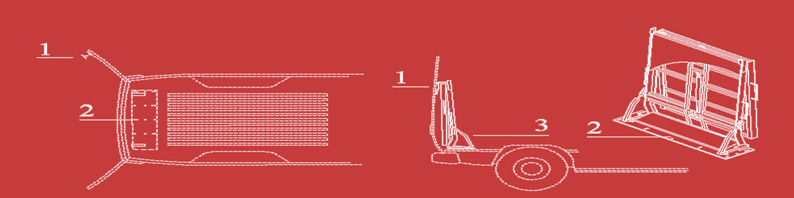
Installatie.
1) Deur klem 2) bevestigingsplaat 3) trekstangen
De
loopbrug, dichtgeklapt, met de bevestigingsplaat,in de vrachtruimte plaatsen,zo
dicht mogelijk(speling ongev. 5cm)tegenaan de gesloten deuren.
De trekstangen zodanig regelen dat de loopbrug(in dichtgeklapte toestand)ongeveer
verticaal op de laadvloer staat.
Vervolgens gaatjes aftekenen,boren en vastschroeven van de bevestigingsplaat.De
bevestigingsplaat wordt stevig op de bodem van de vrachtruimte vastgeschroefd
en dit evenwijdig met het einde van de laadvloer.
De deurklem wordt aan de linkse deur bevestigt.Het korte haakje valt tussen
de twee delen van de loopbrug.
WAARSCHUWING!!
De twee trekstangen moeten beiden steeds aangekoppeld blijven bij het open
en dichtklappen van de loopbrug.
Einbau
1) Türsperre 2) Befestigungsplatte 3) Griff
Den
Laufsteg,zusammengeklappt,mit der Befestigungsplatte, in den Frachtraum stellen,so
dicht wie möglich gegen die geschlossenen Türen(Spielraum:5cm).
Die Griffe so einstellen, dass der Laufsteg( in zusammengeklapptem Zustand)
ungefähr vertikal auf der Ladefläche steht.
Dann die Löcher markieren,bohren und die Befestigungsplatte festschrauben.
Die Befestigungsplatte wird gut auf dem Bodem des Frachtraums festgeschraubt,
ebenso parallel mit dem Ende der Ladefläche.
Die Türsperre wird an der linken Tür befestigt.Der kurze Haken
fällt zwischen die zwei Teile des Laufstegs.
ACHTUNG!!
Die zwei Griffe müssen beide stets verkuppelt bleiben beim Auf-und Zuklappen
des Laufsteges.
Installation
1) L'étau de porte 2) plaque de fixation 3) barre de traction
Placez
la passerelle,fermée,avec la plaque de fixation dans la cale de charge
aussi près que possible ( environ 5cm marge)contre les portes fermées.
Réglez les barres de traction ainsi que la passerelle (fermée)
se trouve verticalement dans la cale de charge.
Ensuite désignez et forez les trous ,et vissez la plaque de fixation.
La plaque de fixation doit être mise sur le font de la cale de charge
et ceci parallèle avec la fin de la cale de charge.
L'étau de porte doit être placé sur la porte gauche.Le
petit crochet tombe entre les deux parties de la passerelle.
AVERTISSEMENT!!
Les deux barres de traction doivent toujours être réunis lors
du rabattage de la passerelle.
Installazione
1) Fermo dello sportello 2) piastra di fissaggio 3) tiranti
Servendosi
della piastra di fissaggio, fissare la rampa di caricamento, rientrata, nello
spazio di carico, il più possibile contro gli sportelli chiusi (con un
gioco di circa 5cm)
Regolare i tiranti in modo che la rampa di caricamento (nella posizione rientrata)
sia all'incirca verticale rispetto al piano di carico .Marcare quindi i fori,
forare e stringere le viti della piastra di fissaggio. La piastra di fissaggio
dev'essere avvitata in modo resistente al fondo dello spazio di carico e in
linea con l'estremità del piano di carico.
Il fermo dello sportello è applicato allo sportello sinistro.Il gancio
corto cade tra le due parti della rampa di caricamento.
ATTENZIONE!!
Entrambi i tiranti devono rimanere sempre collegati nell'aprire e nel rientrare
la rampa di caricamento.